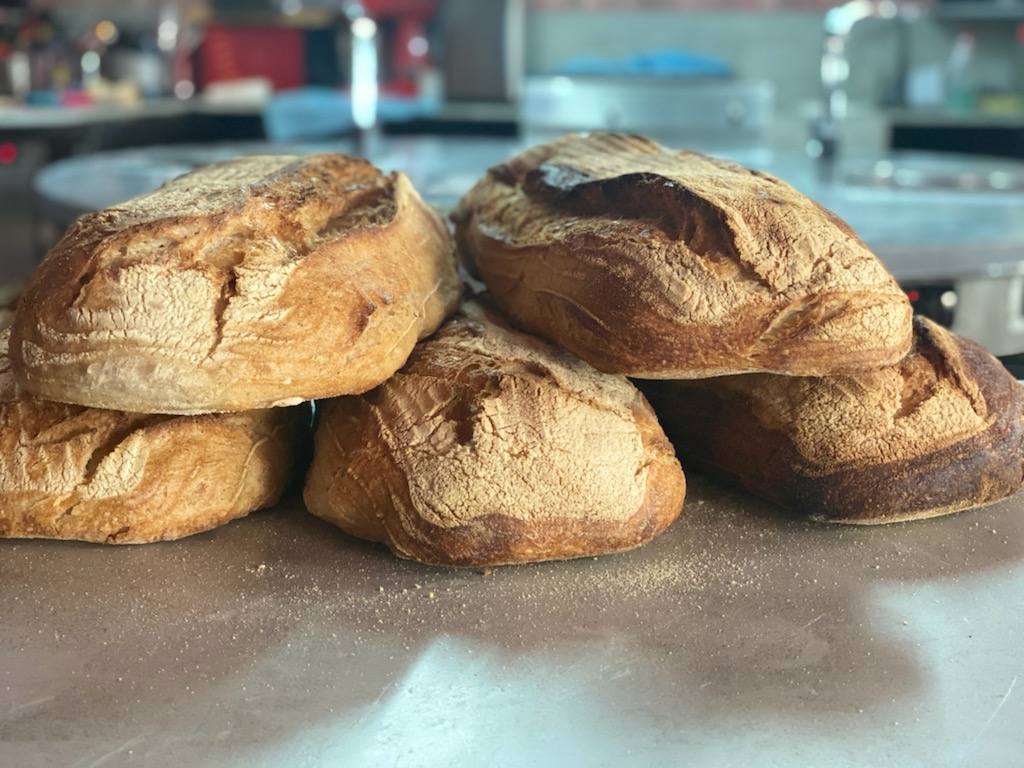
Classic Italian olive oil bread made fully vegan—soft, rustic, and full of flavor.
You know what I love about Pane all’Olio? It’s one of those foods that perfectly captures why Italian cuisine has conquered the world, yet it couldn’t be more humble if it tried. We’re literally talking about bread and olive oil here, two ingredients that have been best friends since ancient times. Somehow the Italians have elevated this simple pairing into something that feels both deeply traditional and surprisingly sophisticated.
There’s something almost revolutionary about the idea that you can take a piece of rustic country bread, dip it into golden extra virgin olive oil, maybe add a whisper of sea salt, and call it not just a snack but a philosophy. It’s that whole “ritorno alla semplicità” thing, this beautiful return to simplicity that says the best food doesn’t need to show off. It just needs to be honest about what it is.
One Bread, Many Lives
What really gets me is how this dish lives so many different lives depending on the moment. Sure, you can grab a chunk of bread and dunk it in olive oil for a quick afternoon snack. Apparently Italian kids grow up doing this instead of reaching for chips, which honestly explains a lot about their relationship with food.
But you can also see it served at the start of an elegant dinner, sitting proudly on an antipasto platter like it belongs there, which it absolutely does. And then there are those gorgeous panini all’olio, where the olive oil becomes part of the bread itself. The result? Soft, aromatic rolls that practically glow with golden goodness.
The fact that you can rub some garlic on the bread and suddenly you’re in bruschetta territory, or sprinkle some rosemary and transport yourself to Tuscany, just shows how versatile this is. This simple foundation can support endless creativity while never losing its essential character.
A Humble Philosophy
This isn’t about being fancy. It’s about being real. You can find this bread in tiny village bakeries or on the tables of fancy restaurants, but at its heart, it’s a humble snack. It’s what you eat when you need a little something to hold you over, or what you share with friends before a meal with a glass of wine. It’s a lesson in conviviality, a simple moment of sharing that makes everything feel right.
This bread is a celebration of simplicity. It proves you don’t need a thousand ingredients to make something delicious. You just need a few, and they have to be good. That’s the secret, isn’t it? When you’re eating Pane all’Olio, you’re not just tasting the flavours; you’re tasting a little piece of history and a whole lot of love.
Make It Your Own
But, the point of this recipe is to make it your own. You can roll the dough into small bread rolls and use them for your “next level” burger. Why not? Honestly? It would be the best burger of your life.
I can be seen eating it on its own with a glass of red wine and a book. Shush now!
Vegan Pane all’Olio with Fresh Yeast
I’ll give you two versions of this recipe, the “proper” long one, and later, on another post, a simple and easier one. Both great. This recipe replaces the egg and specifies fresh yeast, which is sold in small blocks and needs to be “proofed” or dissolved in a liquid before being added to the dough.
Ingredients
For the “Biga” (Starter Dough):
- 1/2 block (about 10g or 0.35 oz) of fresh “live” yeast
- 2 cups lukewarm water
- 1 cup durum wheat flour (or all-purpose)
- 3 cups stone-ground wheat flour (or bread flour)
For the Final Dough:
- The risen “Biga”
- 1 block (about 20g or 0.7 oz) of fresh “live” yeast
- 2 tablespoons extra virgin olive oil
- 23/4 cups strong bread flour (plus more if needed)
- 2 teaspoons salt
Instructions
Prepare the Biga (Starter Dough)
In a small bowl, crumble the 1/2 block of fresh yeast into a few tablespoons of the lukewarm water and stir until it dissolves into a milky liquid.
In a large bowl, combine the dissolved yeast mixture with the rest of the lukewarm water. Add the durum and stone-ground flours. Mix with a wooden spoon until you have a thick, shaggy batter.
Cover the bowl with a damp cloth and let it ferment at room temperature for at least 8 hours, or ideally overnight in the fridge. This starter is what will give the bread a deep, complex flavor.
Prepare the Yeast and Final Dough
If using the biga from the fridge, let it sit at room temperature for about an hour.
Crumble the full block of fresh yeast into a few tablespoons of the lukewarm water (from the 2 cups in the biga preparation) and dissolve it completely. This is a crucial step for the fresh yeast.
Add the dissolved yeast mixture and the olive oil to the biga. Mix until well combined. Gradually add the strong bread flour, mixing with a wooden spoon until a dough begins to form.
Knead the Dough
Turn the dough out onto a lightly floured surface. Knead the dough for about 5 minutes, adding more flour a tablespoon at a time if it’s too sticky. The dough should be soft but not stick to your hands.
Stretch the dough into a rectangle, sprinkle the salt evenly over it, and knead for another 5 minutes until it is smooth and elastic. Form the dough into a ball.
First Rise (Proofing)
Lightly oil a large bowl. Place the dough ball in the bowl, turning it to coat with oil. Cover the bowl with a damp cloth or plastic wrap.
Let the dough rise in a warm, draft-free place for 1 to 2 hours, or until it has doubled in size.
Shape the Bread
Gently “punch down” the dough to release the air. Turn it out onto your floured surface and divide it into 2 or 3 portions for loaves, or into smaller portions for individual rolls (“panini”).
Roll the dough tightly into a cigar or a round loaf shape, pinching the seam to seal it.
Second Rise (Proofing)
Place the shaped loaves or rolls on a baking sheet lined with parchment paper. Cover with a damp cloth and let them rise for another 45-60 minutes, or until they have nearly doubled in size.
Bake the Bread
Preheat your oven to 410°F (210°C). For a beautiful, crusty finish, place an empty metal pan on the bottom rack of the oven to heat up.
Just before baking, use a sharp knife or bread lame to score the top of each loaf. Carefully place the bread in the oven. For steam, pour about 1 cup of cold water into the hot metal pan on the bottom rack and quickly close the oven door. The steam will help the bread develop a crisp, golden crust.
Bake for 20-25 minutes, or until the crust is golden brown and the bottom sounds hollow when tapped.
Cool
Transfer the bread to a wire rack to cool completely before slicing.
Enjoy your completely vegan, rustic Pane all’Olio! It’s an excellent bread for dipping, serving with soup, or making delicious sandwiches.
Have Daily Fresh Bread
Once the dough is done (whatever version of the recipe you choose), cut the dough into small 200g balls. You can do a roll shape or a baguette shape. Put them in a box or Tupperware and store them in the fridge. I’d keep each ball of dough in its own container.
In the morning, take it out, put it in the oven at 200°C for 25 minutes, and you have fresh bread every day. You can make enough for 4 days, then repeat.
Quick & Easy Vegan Olive Oil Bread
The original recipe is not vegan friendly. On the other article I just gave you the ‘proper’ vegan version of the traditional recipe, like a vegan Italian mama would do if there was such a thing.
Now, I wouldn’t be the Brazilian I am if I didn’t give you the improvised, let’s-do-it-a-bit-faster-and-simpler version: Pane all’Olio (Quick Version)
Tips
I have a few little secrets to give you. One, if you have a bit of time, once you mix the liquid and dry in a single bowl, allow it to rise for one hour on the kitchen counter. Just cover it with cling film or a wet, humid cloth. Then you cut it.
Also, I’d bake it only one or two days later. To be honest, do this two days in advance. If you do it regularly, it’s simple: when you are two days away from running out of bread, make another batch.
The second tip: say it’s the last day of the previous batch and it looks flat in the box. Don’t panic, just roll it again and let it rise again for 90 minutes on the counter or overnight in the fridge. In no time it will be up and running like a springbok on a hot summer’s day.